Showing posts with label on. Show all posts

Tuesday, July 19, 2016

Install Android Applications On Windows Phone How to

If you are a Windows phone user but fancies android applications and would like to have android applications installed on your Windows phone, the chance is, if you are having one of the Windows phones listed below; you can have android applications downloaded and installed on your Windows phone directly from the Play Store.

The list of currently supported Windows Lumia phones that can install android applications include the followings;
•Nokia Lumia 920
•Nokia Lumia 925
•Nokia Lumia 929 (icon)
•Nokia Lumia 830
•Nokia Lumia 930
•Nokia Lumia 1520
•Nokia Lumia 635 (1GB RAM variant)
•Nokia Lumia 730
•Nokia Lumia 820
•Nokia Lumia 435
•Nokia Lumia 928

INSTALLING ANDROID APPLICATIONS ON WINDOWS LUMIA PHONE

The process for installing Android apps on your Windows phone is simple however, you have to note these points before you proceed;
1- Note that you are doing it at your own risk because I won’t be held responsible if anything happen to your device.
2- Do not disconnect the device while an apk is installing.
3- Do not reboot while your phone has Developer Mode Activated.

Now, you may proceed installing android applications on your Windows phone following the guides highlighted below:

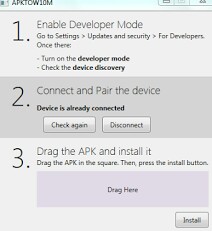
Step 1- Download APKtoWind10 from here. APKtoWind10 is a Windows PC program designed for managing Windows phone applications.

Step 2- APKtoWind10 is compressed in a compressed file. Extract it in using WinRAR, WinZIP or 7zip. Once successfully extracted, install it on your PC and then, Lunch the program.

Step 3- Drag your Android apk file you wish to install on the PC inside the step 3 box and hit the install button.
You may download android applications from Mobomarket.
Credit goes to SDRdaniel, original developer.

If you have anymore questions, use the comment box below

Get

Read more »

Monday, July 18, 2016

WINTOUCH Q75 HANG ON LOGO DONE

WINTOUCH Q75
FIRMWARE
LIVESUITE
                             
SCREENSHOTS:


Get

Read more »

Restore Mobile Network Lost On Android Phones How To

Just like Apple  iPhone 3G, 3GS and 4.What happens to the listed phones is that, when you buy it from another country, and it is locked to another carrier, you will not be able to use it with your local network, you will either need to do a factory unlock on it, or simply unlock it through jailbreak with ultrasnow, snowbreeze evasion etc… if you do none of the above, you won’t be able to use your iPhone with any other carrier other than the one it is locked to.
network fix for android

Similar event is happening to some android phones, especially Samsung galaxy s3. Could you believe i bought, a Samsung galaxy s3 GT-i9300 which is a global variant, that is not locked to any carrier whatsoever. It came with the annoying ICS and i try and upgrade this to Android 4.1.2 official jellybean. The upgrade process went very smoothly but when i reboot my phone, Alas, i got no servicee, meaning i cannot make call, i can’t use Bluetooth, i can’t use wifi. In short, i cannot use anything related to connectivity. I downgraded this phone, but still, no luck i was so frustrated until i found a solution which solved 70% of my problem. I was able to restore mobile network, and partially restore WiFi, However i couldn’t use my Bluetooth. I was so happy that at least i can use my phone for what is primarily meant for. Let me share with you how i did this;
Disclaimer & Warning!

     It is strongly advised that  you use this tutorial only for Samsung Galaxy s3 Although i used it successfully on a friend’s HTC, But you use it on other android phones at your own risk. Trying using this tutorial  in any other Android device May result in unpleasant outcomes of which am not liable.So before you proceed,  Check your device’s model number in: Settings » About phone. Try this at your own risk. Although, it is very unlikely that your device will be damaged if you follow all the instructions here to the last letter in this tutorial

Important Pre-Requisites

  • Root your Samsung galaxy s3 smartphone preferably with framaroot Here
  • Download and install Busybox full installer from googleplay store or from any other source
  • Download ARIZAPatch.apk.
STEPS TO RESTORING YOUR LOST MOBILE NETWORK:
  1. Root your phone
  2. Install busybox (busybox pro recommended because it comes handy with the full installer)
  3. Install and Launch ARIZAPatch and select the offline patch mode.. It will verify that your phone has been rooted and busbox properly installed.
  4. That is all, after reboot, your phone will rediscover its lost cellular network. Like i said earlier, you can try this on other android phones having similar problems. But do this at your own risk.
Read also: How to slove NVRAM and wifi Error in Androids
Read also: How to flash HTC Androids
NEED FURTHER ASSISTANCE? Whatsapp:08106847913. BBM:5C099290

Get

Read more »

Video How to flash Android 6 0 on Ulefone Power with Windows 7 Computer


Dear users of Ulefone Power,
We have offered the Android 6.0 ROM of Ulefone Power on our website for you guys to flash on computer, but many people tell us that the text guidance is quite hard to follow, so we have made a detailed video to help you flash more easily.


Don’t miss any of our future video tutorials, follow us on Youtube. Like us on Facebook. Add us in your circles on Google+. Watch our photo albums on Flickr. Subscribe now to our newsletter. Biggest firmware download center.

Get

Read more »

USB OTG Cable 7 Important Things You Can Use it For On Android Devices

OTG is short for On The Go. USB OTG is a standard that enables devices to talk to one another. USB OTG Cable is an important tool to creates a link between your mobile phone and other computer peripherals such as USB flash drive, Mouse, Keyboard, Digital Camera, Game Pad, Card reader, External hard-drive etc.


OTG Cable can do some really clever things and many people have never heard of it. If you dont know your OTG from your OMG, lets discover what it is and why its so great.
Below are the 7 important things which you can do with USB OTG Cable on your Android Devices 

1. Share Battery Charge Between Two Android Devices


For sharing the battery charge, all you need is a regular data/charger cable that you use to connect your smartphone to your PC and a standard USB OTG Host cable. If you do not have an OTG host cable, then you can buy them very cheap from any mobile store or from online shopping sites.

When you have everything ready, connect the USB data cable to one of the phones. Connect the USB OTG host cable to the other phone. And finally attach the two cables together. You will notice that the phone with smaller charge level has started to charge. The charging will continue until the batteries of both the phones has almost the same level of charge.

2. Super-fast Files Transfer Between Two Device


When it comes to Android files transfer, lots will choose the commonly used way, Bluetooth, NFC, USB cable and PC for example. Nonetheless, when using these methods, connection issues always occur. And transmission is quite slow. So, in todays guide, a new solution – USB OTG will be introduced.
USB OTG, empowers USB devices like Android phones to act as a host and then allows other USB device to be attached to them. You can make direct connection between two Android phones/tablets and transfer files between Android via USB OTG. By using USB OTG, Android phones plugged-in can communicate with each other without the need to be connected to a computer.

When its come to transferring heavy files like game data and HD movies, using an OTG cable is the best way to get it done with a fastest way.

3. Connection of 3G Modem with Android Devices

People who have WiFi only tablets or without 3G support might find the need to use 3G Modem with their device to get something downloaded quickly when the broadband is too slow or down. This can be done using an Android app called PPP Widget. As the name suggests, it is a widget, not an app. It is available in the Play Store and it is free. Download it to your device from here.

4. Using an External GamePad


Playing games on a touchscreen is not the same as holding a real Gamepad or a portable console like PSP. Many game developers have finally realized that in order for their games to be successful, they have to support Android. To really win Android users over, they should also accommodate us hardcore gamers who have OTG cables with the ability to hook up controllers to our devices.
Games like Dead Trigger and Asphalt already support Gamepads, but many others are still touch only. Some will only work well with touchscreen input, like Blek, but action games like FIFA 15, Modern Combat 4 and Shadow Gun can definitely benefit from an external Gamepad.If you have a tablet, you can try connecting your Gamepad with your device using your OTG cable.

5. Connect USB Flash Drive to Your Android Device


Flash drives spent a good amount of time as the number one way to take your files with you wherever you needed to go. As some of that has changed with Android devices and cloud storage, many of us still have those USB flash drives kicking around looking for a good use. USB Flash drive is not meant for your computer alone, you can use it with your Android device as long as you have your OTG cable with you. It’s plug and play with no settings needed. Think about the possibilities: watching movies from your flash drive, moving files around, reading documents stored on USB Flash etc.

6. Connection of a Mouse to Your Android Device


When a USB mouse is connected to your Android Device using a USB OTG cable, a mouse pointer appears on the screen. Click to select and open items on the screen.
The following applies when using a USB mouse on your Android Device:
  • The touch screen continues to function when a mouse is connected.
  • Right-clicking performs the same action as left-clicking.
  • To scroll up, down, left or right in a menu, use the mouse scroll wheel, or click and drag the screen in the direction you want to scroll.
  • To change the mouse pointer speed, go to the Settings menu, touch Language & input, and then touchPointer speed. Move the slider left or right to achieve your desired pointer speed.

7. Connection of a USB Keyboard to Your Android Device

When a USB keyboard is connected to your Android Device using a USB OTG cable, touch inside a text input area to begin using the keyboard.
The following applies when using a USB keyboard on your Android Device:
  • The on-screen keyboard is hidden when a physical keyboard is connected.
  • Some of the key combinations that perform actions on Windows computers also work on a tablet, in most apps. For example, you can Cut (Ctrl + X), Copy (Ctrl + C), and Paste (Ctrl + V) using your keyboard.
  • To find settings options for the physical keyboard, go to the Settings menu, touch Language & input, and look in the Physical keyboard section.
USB OTG (On-The-Go) supported devices are Sony, Xperia Z, ZL, Z Ultra, Z1 - Samsung Galaxy S2, S3, S4, Note 1,  Note 2, Note 3 - Tecno F7/H7/R7/Phantom A+/Tablets - Motorola: Moto G Phone | Xoom Tablet - LG Optimus G, G2, G3 G Pad 8.3 7.0 8.0 10.1 – HTC X, One, One mini, One max, M7, M8 - Nokia Lumia 2520 Tablet | Nokia 603 | Asha 300 | C6-01 | C7 E6 E7 | N8 - Google Nexus 5 / 6 / 7 / 9 / 10, all Q Mobiles and many more.

To Buy an OTG Cable

 OTG (On-The-Go) cable is available in the Mobile market. To use this cable with the phone, firstly you need to check whether there is support in the OTG or not. You can check this capability with ” USB OTG Checker” from Google Play Store.

It can be as cheap as $3 and if you’re in Nigeria, you can get it for as low as N600 on Jumia and Konga.


Get

Read more »

MTN BIS Rocking On Android Devices

This step is easy and straight forward. Download and install the latest Tweakware app from PlayStore. -
* After installing the application, recharge your mtn line with #70 and dial *216*7# , …… you will receive a confirmation that you have been subscribed to mtn blackberry play for 24hours.
 * Now, launch the Tweakware app, go to settings, click on Bundled Settings, Tick use Bundled Setting, and select MTN- BIS-1 from the Bundled Settings list. -
* Now again, enable your mobile data and then connect the Tweakware app and you be online in a few seconds after it connects. -* Enjoy!. And Drop your testimonies..

Get

Read more »

Opera Handler To Browse Free With Glo On Any Device

Tweak Opera Handler To Browse Free With Glo On Any Mobile Device Hello we say tech readers, One way or the other, we just got to keep browsing the internet free or extremely cheap. From one tweak to the other, I am going to keep going but I want you guys to ride along. This tweak is for Glo subscribers so if you want to enjoy this tweak, you might just need to port to Glo if you can. By the way, this tweak works for Java, Symbian and Android devices only. Your requirement is for you to download Opera Handler for any of the above operating system platforms. Configure your mobile device and Opera Handler with the following IP: 190.129.010.245
Port: 80
Apn: glosecure homepage: http://wap.gloworld.com
Configure the below on your opera handler:
Primaryserver: http://82.145.211.1680
secondary server = socket:// 82.145.211.16:1080
Proxy type:HOST
Proxy server: wap.gloworld.com
For opera7.1 handler proxy type:
Host Proxy server: Wap.gloworld.com
Enjoy It While It Last
 Click here to SUBSCRIBE to this Blog to Receive future updates..

Get

Read more »

The romantic OUKITEL C3 hands on video with 39 99


Last week we got the external view of OUKITEL C3, showing it’s beauty,  elegance and romance. As it already enters the presale period, we need to see the specs and features.Below is the hands on video of OUKITEL C3 showing the main specs and some features.

Starting off, OUKITEL C3 gets Android 6.0 on MT6580 Quad-core chipset, along with 1GB of RAM and 8GB of storage, supporting 32GB expandable memory. Its worth pointing out that the phone doesnt have support for LTE, but in this way, it can work both in European countries as well as American market. With a 5-inch, 720 x 1280 resolution LTPS panel, good for a density of 294 pixels per inch, good enough to show clear and sharp colors.

For imaging, OUKITEL C3 makes full use of a 8-megapixel camera and 2 megapixel front camera As mentioned, the C3 is a pretty romantic device, it is available in several colors, including dark blue, clear blue, rose gold, white, and black. Among the wallet-friendly devices, the C3s diamond-like back pattern makes it stand out and the price also surprise us.

OUKITEL C3 is one of the most extremely affordable devices, the price range from $39.99 to $54.99 through online re-sellers. From May 5th-May 7th, there is a big flash sale for this handy, pretty and well-done device. Many fans could get it at only $39.99. 


Don’t miss any of our future video tutorials, follow us on Youtube. Like us on Facebook. Add us in your circles on Google+. Watch our photo albums on Flickr. Subscribe now to our newsletter.

Get

Read more »

Sunday, July 17, 2016

Install Android OS On your PC Just As you Install Windows Remix Android OS

Starting from the big-names in the PC OEM manufacturers to the little-known-about manufacturers in the industry, we have seen PCs made with android OS pre-installed. The most recent of them common in Nigeria is the Lenovo N-Series products. Now, Remix OS now make it possible for you to install fully operational Android OS on your PCs. Be it Mac, Windows or Linus machine, you can now install Android OS completely on the PC or, on a separate partition still on the same PC. 
Remix OS | ShoutAmLoud

This recent development is made possible by Jide Technologies. Remix OS is now publicly available starting January this year, 2016.

Already anticipating to have this wonderful OS installed on your PC? Wait a minute! Lets see the preview of what the Remix OS looks like.

As earlier mentioned, Remix OS is built from source on the Android OS. Unlike the previous Android emulators that work on both Windows and Mac, Remix OS is a complete Android OS on its own and can be installed similar to the way your Windows or Mac OS is being installed.

Be it a Windows PC or MAC, Remix OS runs on both. The idea of the Remix OS is to bring the complete Android OS experience onto your PC. Featuring the native multitasking operations of other OSs, you can open multiple apps at the same time and use them simultaneously. You can maximize, minimize and resize windows -all these, to mention a few.
Remix OS Desktop View | ShoutAmLOud

In the Remix OS, the notifications panel of the native android device has received a makeover to take advantage of larger computer screens. The OS is designed not only for keyboard and mouse users, but also for those who have a touchscreen device. Jide Technology also claims that Remix OS has the most advanced Android file manager. You can launch Google Play Store and download apps just the way you do on any android devices.
Remix OS Notification Area | ShoutAmLoud

One concern that users have before installing Remix OS is software updates. Meanwhile, this should not be a problem since the OS has an OTA system update implemented to make installing the latest update easy.

If you are interested in installing Remix OS on your Windows PC, computer, laptop, iMac or Macbook, you may check our twitter tag at: #RemixAndroidPC or here: Remix OS, Android PC Updates.

Have you installed Remix OS before? Lets here from you! Give us feedback in the comment section below.

Get

Read more »

Sallah Deal Get 5 5GB Free on Every Gadget You Buy at KONGA


Sallah is just by the corner and you won’t want
to let it just pass you buy without you getting an
amazing % slash down this season. To all my
lovely Muslim readers, I wish you all EID-EL-
KABIR celebration in advance. Don’t let this
season just pass you bye like that without you
getting amazing gift and gadget for your love
ones
Here are the deals
==>Glo just partnered with Konga to deliver
unlimited happiness with amazing offers to their
subscribers among which is as follows
Glo recharge N1,000 and get extra N1,000 off
your first order. Imagine you on Glo Bumpa, and
you recharge N1,000, you get extra N2,000 plus
the the extra N1,000 pin that will be send to you
that’s wooping N4,000 Airtime.
You get 4.5GB Free Data on any gadget you buy.
See more info here
==>Sallah Deals are life on Konga, that gives you
8% discount including live Goats, Ram and Cow,
15% off Prayer matts and discounted amazing
deals for EID-EL-KABIR celebration.
Click here for more discounted deals.
Don’t miss this offer!


Get

Read more »

MTN BIS Still Blazing on PC via Simpleserver

Honestly speaking, I couldnt remember when last I subscribed on my line. Why? because there is just too much cheats to enjoy. Few days ago, I got few complains regarding to MTN BIS not working perfectly on their computer, and I was surprised that most persons still don’t know how to setup the MTN simpleserver trick that I’ve been on trend for about 1yr plus.

In this guide, I would walk you through the process on how to setup MTN BIS trick on PC via simpleserver, and I would further illustrate my guide with the help of images.

Before you get started, opt-in for any of the below MTN BB10 plans:

    For BBlitem monthly plan (#1000), simply dial *216*3*3#
    Weekly, simply dial *216*3*2#
    Daily, simply dial *216*3*1# or you can sub BBlited daily (#70) dialing *216*7#

How to Use MTN BIS tweak on PC via Simpleserver

    Firstly, download the simpleserver program from here.

    After that, extract the folder from the zipped file you downloaded, to your desktop screen.


    Now, open the folder, and you’ll see two files, one is the launch file “Simpleserver.exe” and the other is the setup file “Simpleserver.ini”.


    Before you launch the “Simpleserver.exe” file, first setup your internet access point to “web.gprs.mtnnigeria.net”.

    Once your internet access point is set, connect your modem, and launch the “simpleserver.exe”, then minimize it.

    Next, launch your browser and set http to 127.0.0.1 and port to 8080.

    For Mozilla firefox users, setup should be as the image shown below.

    For chrome or other browsers, setup should be as shown in the image below.

    Once the setup is completed, start browsing the internet.

That’s it on how to setup MTN BIS on PC via simpleserver. Next time, I would publish full guide to activate the MTN BIS tweak for Android, already explained here, but would publish with screenshots later. I would also guide you on how to use your MTN BIS PC tweak via simplesever to power background apps.


Get

Read more »