Showing posts with label to. Show all posts

Tuesday, July 19, 2016

How to Update OnePlus 2 to Oxygen OS 3 0 2 OTA


OnePlus 2 Oxygen OS 3.0.2 latest update is available now around the world, the Oxygen OS 3.0.2. To get the 3.0.2 OTA to work, you will need to be on 3.0.1 beta version.


If you want an outright 3.0.2 firmware file that would work on any given Oxygen OS version of your OnePlus 2, then wait for a while till that becomes available. When it does, we will be sure to update this post with that.


View my Flipboard Magazine.


÷ Prerequisites:

•Make sure there is at least 80% battery left on your smartphone before begin.

•Make sure your OnePlus 2 have Oxygen OS 3.0.1 Beta version installed .


*Disclaimer:

Android Custom ROM fix ® provide various Firmware Updates and Rooting process along with Custom ROM,Modes,file are all belong  to their owners/developers. The autor of this site or the developers are not responsible,  if you damage or brick your device.Do it on your own risk and follow the instruction properly.

* Important:

Backup important files stored on your device before proceeding with the steps below, so that in case something goes wrong you’ll have backup of all your important files.


÷ How to Update OnePlus 2 to Oxygen OS 3.0.2 OTA.

* Method 1:  for nonrooted users with stock recovery.


1- Download OxygenOS 3.0.2 Zip from the download section.

2- Connect your device to PC and put Zip file anywhere in the phone Internal Storage.

3- Now boot in recovery mode. Reboot into recovery by pressing power+volume down button .

4- Once you are on stock recovery. Select English Language.

5- Then select Install from Local and browse the ZIP file that you save on your phone in step 2.

6- Select the Zip file and click on Install.The installation will start.

7- Once the flashing is completed, reboot your OnPlus 2.

Done! Your Oneplus 2 now has the latest OxygenOS 3.0.2 Android 6.0.1 Marshmallow.

*Method 2: if your device is rooted and you have TWRP recovery:


1- Download OxygenOS 3.0.2 Zip  and Modified TWRP recovery.img.
Keep both these files anywhere in the Internal Storage.

2- Now Boot into TWRP.Now Wipe data.To Do So Go to  Wipe > Advanced Wipe > Select Dalvik,System,Data,Cache>Swipe to wipe.

3- Now from TWRP home.Select Install.

4- Select Images button at bottom right.Select recovery.img .Select Recovery.Swipe to flash.

5- Then return back to TWRP Home.Reboot -) Recovery.Wait to reboot into recovery.

6-Now again do a wipe data. Wipe > Advanced Wipe > Select Dalvik,System,Data,Cache>Swipe to wipe.

7- Go to TWRP Home.Install > Select OxygenOS Zip.Swipe to flash.

7-Reboot into System.
Done !


That’s it! Your OnePlus 2 should now have OxygenOS 3.0.2 on your phone! Go to Settings > About phone to verify.

Like this post? PLZ Hit the share buttons below to share this article with your friends on Facebook, Google + and Twitter.

PLZ Follow Us On Flipboard 4 More OnePlus 2 Latest Updates.

PLZ Use the comment box below to contribute more ideas & Suggestions .

Best Regards.


Get

Read more »

Install Android Applications On Windows Phone How to

If you are a Windows phone user but fancies android applications and would like to have android applications installed on your Windows phone, the chance is, if you are having one of the Windows phones listed below; you can have android applications downloaded and installed on your Windows phone directly from the Play Store.

The list of currently supported Windows Lumia phones that can install android applications include the followings;
•Nokia Lumia 920
•Nokia Lumia 925
•Nokia Lumia 929 (icon)
•Nokia Lumia 830
•Nokia Lumia 930
•Nokia Lumia 1520
•Nokia Lumia 635 (1GB RAM variant)
•Nokia Lumia 730
•Nokia Lumia 820
•Nokia Lumia 435
•Nokia Lumia 928

INSTALLING ANDROID APPLICATIONS ON WINDOWS LUMIA PHONE

The process for installing Android apps on your Windows phone is simple however, you have to note these points before you proceed;
1- Note that you are doing it at your own risk because I won’t be held responsible if anything happen to your device.
2- Do not disconnect the device while an apk is installing.
3- Do not reboot while your phone has Developer Mode Activated.

Now, you may proceed installing android applications on your Windows phone following the guides highlighted below:

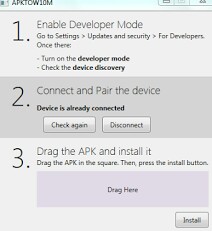
Step 1- Download APKtoWind10 from here. APKtoWind10 is a Windows PC program designed for managing Windows phone applications.

Step 2- APKtoWind10 is compressed in a compressed file. Extract it in using WinRAR, WinZIP or 7zip. Once successfully extracted, install it on your PC and then, Lunch the program.

Step 3- Drag your Android apk file you wish to install on the PC inside the step 3 box and hit the install button.
You may download android applications from Mobomarket.
Credit goes to SDRdaniel, original developer.

If you have anymore questions, use the comment box below

Get

Read more »

Video Photo Gallery Unboxing Gatekeeper Key 2 0 Secure Access To Your Computer


You can now buy Gatekeeper Key 2.0 from Gkchain.com for only 49.99 USD with free shipping.

Gatekeeper 2.0  Walk away to lock your computer Walk back to unlock it. The Gatekeeper is a Lock and Key system for your computer. Using the KAtekeeper device, the user can automatically lock and unlock his/her computer based on proximity. For the security conscious, GateKeeper provides 2-factor authentication (2FA by GateKeeper + PIN) to log on to your computer when you walk back to it. For convenience, users can enable the auto-unlock feature which unlocks the computer automatically when you are close to it. Our mission is to provide security WITHOUT introducing complexity and inconveniencing the average computer user.

Gatekeeper Key 2.0  Features
Military grade security. AES-128 and AES-256 security in a hands-free access control device. Walk away to lock; Walk back to unlock.

Modernize IT Network. Protect your corporate data with military grade encryption and 2-factor access control. GateKeeper secures computers in hospitals, offices, and businesses. Implement advanced access control solutions quickly and efficiently, to improve company security, employee productivity and morale.

Walk Away to Lock. With the GateKeepers auto-lock ability, computer privacy becomes an afterthought. Hospital Administrators - Dont rely on time-out policies to protect yourself from HIPAA violations and massive fines! Implement "Walk Away to Lock" with GateKeeper.

No Lost Keys. Stop wasting time looking for lost items. The GateKeeper also helps track down your devices and set alarms for when items are out of range.

Gatekeeper Key 2.0 specifications

GateKeeper: USB Lock and Keyfob
Security: Military grade AES-128 and AES-256 encryption
Compatibility: Windows 7, 8, 8.1, 10; Mac OS X (BETA)
App: Android 4.3+, iOS 7.0+
Battery Life:  6 months (CR2032 battery)
Range: 30 feet
Wireless: Bluetooth 4
Size/Weight: 45mm x 25mm x 6mm; 10gm


GateKeeper Android Application - Locate and Alert.
This GateKeeper app that works in conjunction with the GateKeeper Chain (GK Chain) to enable users to locate and track desired objects. The GK Chains can also be used to auto-lock and unlock your computer using our GateKeeper software.

There are two main operating scenarios for this app.
ALERT Mode. The app can be set to “ALERT” mode wherein the smartphone keeps track of the GK Chain. In the “ALERT” mode, if the user carrying the smartphone walks away from the GK Chain, it will start beeping and warn him that he/she has forgotten the GK Chain.
LOCATE Mode. The app can also be set to “LOCATE” mode in which the user can use the app to locate the GK Chain. In this scenario, the app will connect to the GK Chain and indicate to the user how far it is from the smartphone. As you walk around, the app will indicate whether you have moved closer or farther away from the GK Chain. Using the "LOCATE" feature will also cause the GK Chain to buzz making it easier for you to find your lost valuables.

GateKeeper Auto-Lock and Unlock Software for your computer:
The GK Chains can also be used to auto-lock and unlock your computer (Windows and Mac). Along with the USB Lock, the GateKeeper software tracks your proximity to your computer and locks it when you walk away. Protect your privacy with this easy to use Bluetooth Low Energy solution. You can also use GateKeeper as a two-factor authentication system to add security to your daily computer use. With the GateKeeper software and two-factor authentication enabled, you will need to have your GK Chain AND type in your password to unlock your computer. Pretty awesome right?

The GateKeeper app requires Android 4.3 and above. The GateKeeper software works with Windows 7, 8, 8.1 and Mac OS X.

 
Package content 
1 * GateKeeper Key 2.0
1 * USB Lock
1 * English Quick Start Guide
1 * CR2032 Battery

1 * Key Ring
1 * Lanyard 

Photo gallery full album here. 
About Banggood. Banggood was founded in 2004, specializing in computer software research and development. Focusing on foreign trade e-commerce. From there it developed into an online retailer for almost everything you need for happy living, eating and entertaining. We have 4 offices, one in Hong Kong, one in Shenzhen,one in Hangzhou, and one in Yiwu. Banggood’s heart is in Guangzhou it is where all the Banggood magic happens, there you will find our main office housing 1000+ employees from customer service to product managers. The whole team is committed to providing low price, high quality products and professional services to global customers.


Don’t miss any of our future video tutorials, follow us on Youtube. Like us on Facebook. Add us in your circles on Google+. Watch our photo albums on Flickr. Subscribe now to our newsletter. Biggest firmware download center.

Get

Read more »

How to Update Sprint Moto E LTE XT1526 to Android 6 0 1 Marshmallow XOSP 6 1 ROM


According to XDA member Shreesha.Murthy, Android 6.0.1 Marshmallow XOSP 6.1 ROM is released for Sprint Moto E LTE XT1526[ surnia].


÷ ROM Features:

Based on CM 13.0
Removed many unnecessary apps and stuff as well as CM ones
StatusBar Clock font style
StatusBar Clock font size
Added StatusBar Date & style options
Added option for date style/position, left-right of clock
Xperia Z5 inspired LockScreen style
Xperia Fonts
Xperia Battery Text prototype
Time Contextual Headers
XOSP Universal dialog for Shutdown/Reboot and Dexopting Process
XOSPOTA
Stock Kernel
Snap Camera
ViPER Audio Engine
Theme Chooser
Xperia based Bootanimation
Custom Framework and SystemUI Xperia drawables
XOSPFileManager
Xperia Z5 sounds
Xperia X Wallpapers
XOSPSetupWizard
Custom Materialized
Stock Browser is custom themed
Contacts is custom themed (Much more Xperia Style)
Dialer is custom themed (Much more Xperia Style)
Status bar logo
Navigation Bar ON/OFF
NavBar dimensions
SlimDim
HW Keys ON/OFF
SlimSeek Bar
Status bar Network Traffic indicator
RAM Bar in recents options
Toast Animations
Long Press back to kill in Development Settings
Ability to hide the Super SU status bar icon
Dashboard Columns
Dashboard double lines toggle
Double Tap to sleep anywhere on the lockscreen
On-the-go Mode
Double tap to sleep on navigation bar
SystemApp remover
Omni inbuilt SystemUI Screen recording
SuperSU
Xperia Apps
Xperia Z5 Home app
Album App
PhotoEditor
PhotoAnalyzer
Xperia Keyboard (aka textinput-tng)
Music (former WALKMAN)
Video
SemCalendar
AudioRecorder (Material Version)
ClockWidgets
Sketch
SmartConnect
WallpaperPicker (For Xperia X custom wallpapers)
Weather App
Wheater Widget
Walkman Widget
Track ID
SomcPodcast
SemcDLNA...


÷ Prerequisites:

•This tutorial is only for installing Android 6.0.1 Marshmallow XOSP 6.1 ROM on Sprint Moto E LTE XT1526[ surnia]. Please do not try on any other Moto E LTE variants.

•Your phone should be rooted and haveClockworkMod recovery installed from before.

•This tutorial will wipe out all your data.Proceed at your own risk.Perform a Dalvik Cache wipe before proceeding from the recovery mode.

Make sure you backup all your data in your phone before proceeding.


View my Flipboard Magazine.


 *Disclaimer:

Android Custom ROM fix ® provide various Firmware Updates and Rooting process along with Custom ROM,Modes,file are all belong  to their owners/developers. The autor of this site or the developers are not responsible,  if you damage or brick your device.Do it on your own risk and follow the instruction properly.

* Important:

Backup important files stored on your device before proceeding with the steps below, so that in case something goes wrong you’ll have backup of all your important files.

ROM Download & Installation Instructions via XDA.


For More Sprint Moto E LTE XT1526 updates Keep Checking Android Custom ROM Fix™®

Like this post? PLZ Hit the share buttons below to share this article with your friends on Facebook, Google + and Twitter.

PLZ Follow Us On Flipboard 4 More Latest Updates.

PLZ Use the comment box below to contribute more ideas & Suggestions .

Best Regards.


Get

Read more »

What To To Do If You Forget Your Mac Password

Do you have a problem where your memory fails you as to remembering your Mac’s password? Don’t break too much sweat over it. Making use of the default settings, you for sure can be able to with ease try logging into your Mac. If you happen to fail enough times then the ability to reset your password with your Apple ID may come within your reach. You can’t say this is always the case though.
In the case where you haven’t enabled FileVault disk encryption, you could access an easy password-reset tool. If you have gone about enabling FileVault disk encryption and you wish to forsake your encrypted files, you can simply go through the reinstallation of the Mac OS X and begin the process again.
If you have forgotten your Mac Password
Reset Your Password Using Your Apple ID
This trick would be compatible if you’ve connected your Mac account with an Apple ID. It will go through in the condition where you haven’t set up FileVault disk encryption, or possibly if you had set up FileVault disk encryption and had Mac OS X keeping your recovery key in your iCloud account. This happens to be the default option. But then note that it will certainly not work if you have enabled FileVault and didn’t store your recovery key with your iCloud account,
In the case where you have lost memory of your password, simply try entering the wrong password three times at the sign-in screen. Following the entrance of the three wrong answers, you will get to see a “If you forgot your password, you can reset it using your Apple ID” message. Move on to click the button and enter your Apple ID details so as to go about resetting your password.
The Recovery Key is a Safety Key
Enter Your FileVault Recovery Key
If you’ve enabled FileVault disk encryption and may be it happened that you failed to store your recovery key in your iCloud account, the FileVault setup tool provided you with a recovery key and then informed you to print it out or write it down maybe store it somewhere where you could fetch it if needed. This — in exclusion of the password — is then the only thing that could decrypt the files stored on your Mac and then hand you access in to them.
Taking the assumption that you are in possession of this recovery key, you could type the recovery key into the password field on the login screen. This process would prompt the decryption of your Mac’s storage and then consequently sign in you in. From when you gotten signed in, you could go about changing the password from the basic Users & Groups tool in the System Settings window.
If you have forgotten your Mac Password
Reset the Password From OS X Recovery (If You’re Not Using FileVault Encryption)
Also in the condition where you haven’t enabled FileVault encryption, you have a comfortable means to reset any user account’s password. What you simply need is to restart your Mac and hold Command + R while it’s booting. This very procedure will enable the booting of your Mac into a special recovery mode, also referred to as OS X Recovery.
From OS X Recovery, you get within the access of a concealed password reset tool and make use of it to change any user account’s password on the Mac. This is one big justification why you should enable FileVault encryption on your Mac — it sets a bar abhorring people from entering the password and gaining access.
In the rare circumstance that you’ve enabled a UEFI firmware password on your Mac, you would be unable to gain access to OS X Recovery except when you remember that password. You will not be able to remove that UEFI firmware password unless visiting an Apple Store — at least this works theoretically. This contributes significantly in barring thieves from just erasing the UEFI password of a MacBook after they could have stolen it.
Put in your Apple ID
Sign In As Another User (If You Are Using FileVault Encryption)
If you are in possession of user accounts exceeding one on your Mac and are using FileVault encryption, attempt logging in as the other user account. In the scenario where you have given that other user account permission to decrypt your Mac with its password, you would be allowed to sign in and then gain access to a desktop. There you could create a new user account or possibly retrieve access to your old user account.
Reinstall Mac OS X (If You Are Using FileVault Encryption)
Should there be a UEFI password on your Mac, you won’t be allowed to access OS X Recovery so as to reset the password or possibly embark on the reinstallation of the Mac OS X without that password. You come to face a big lock icon appear on your screen and a box to type your password when you make an attempt to boot into recovery mode or say when you boot from an external device.
This is a entirely a different password from your user account’s password, so there is the chance that you remember this one. But if you don’t, the sole means to potentially go about the removal of that UEFI password is to take your Mac to an Apple Store.
There could be some kind of attack that gives an attacker the chance to bypass a UEFI password, but according to the supposedly theoretical setup, only Apple can go about removing an unknown UEFI password.
Should you not remember your Apple ID (iCloud) password, Apple’s website provides an Apple ID password reset tool that might be assist you in this regard.


Get

Read more »

Update Galaxy Note 4 SM N910P to Android 6 0 1 Marshmallow Mr Wonderful Slimmed Odexed N910PVPU4DPE1 ROM


According to XDA member tx_dbs, Android 6.0.1 Marshmallow Mr.Wonderful Slimmed Odexed N910PVPU4DPE1 ROM is now Available For Sprint Samsung Galaxy Note 4 SM- N910P.


You can find out How to Apply it Right Now Via This Easy Tutorial.

÷ Rom Features:

Fully odexed system with a hybrid odexed/deodexed framework
Removed/disabled Knox and Sprint Itson
Removed almost all Google apps (install what you want from Google Play Store)
Includes almost all factory installed Samsung apps (more can be installed from Galaxy apps or Google Play)
Include Sprint Zone app and Visual voicemail (use Sprint Zone app to install any Sprint sponsored apps and manage your Sprint account etc.)
Removed ALL additional bloat apps that normally get installed by default
All preinstalled apps have been updated as of 6/11/2016
No stock Samsung features/services where removed (I leave these things so that the phone is fully functional the way it should be.)
Native hotspot has been unlocked
5-way reboot mod
High volume warning disabled (when using the 3.5mm headphone jack with ear buds, etc you will not get the annoying popup)
Xposed friendly framework (ofcourse theres no guarantees that Xposed modules will not cause problems with ANY rom)
CSC mods
In-call recording
added camera shutter sound option
Use camera during phone call
Added call/message blocking in settings (useful for when youre using hotspot and dont want incoming calls to disconnect it)
Silenced power on & off sounds (you can rename the boot animations and power on/off sounds in system/media folder. Remove "-OFF" from the file name to make them active)
Hulu and Netflix work upon flashing ROM (to use Google media streaming services etc you will have to rename system/vendor/lib/liboemcrypto-OFF.so to liboemcrypto.so)
I cant remember what else...


÷ Prerequisites:

•This tutorial is only for installing Renegade v4 [PD2] [ Aroma] ROM on Sprint Samsung Galaxy Note 5 SM- G910P. Please do not try on any other Galaxy Note 4 variants.

•Your phone should be rooted and haveClockworkMod recovery installed from before.

•This tutorial will wipe out all your data.Proceed at your own risk.Perform a Dalvik Cache wipe before proceeding from the recovery mode.

•Make sure you backup all your data in your phone before proceeding.

•Samsung KIES will NOT detect your phone after installing this ROM because it is a custom firmware.

View my Flipboard Magazine.


 *Disclaimer:

Android Custom ROM fix ® provide various Firmware Updates and Rooting process along with Custom ROM,Modes,file are all belong  to their owners/developers. The autor of this site or the developers are not responsible,  if you damage or brick your device.Do it on your own risk and follow the instruction properly.

* Important:

Backup important files stored on your device before proceeding with the steps below, so that in case something goes wrong you’ll have backup of all your important files.

ROM Download & Installation Instructions via XDA


For More Samsung Galaxy Note 4 updates Keep Checking Android Custom ROM Fix™®

Like this post? PLZ Hit the share buttons below to share this article with your friends on Facebook, Google + and Twitter.

PLZ Follow Us On Flipboard 4 More Latest Updates.

PLZ Use the comment box below to contribute more ideas & Suggestions .

Best Regards.


Get

Read more »

Method to Root New Infinix Zero 3 X552

The much awaited Infinix Zero 3 is now available for sale!. The Infinix Zero 3 was launched late last year and it comes with amazing features, it looks like a pretty great device. Zero 3 body-design is immense classic and premium, it comes with a dual-sided explosion-proof glass and stainless steel frame. The front is found to come with glossy piano paint while the back features meticulously brushed metal.  

If you are in need of Infinix Zero 3 X552, its now available for grab in Jumia Stock with the price of N53,000, rush in and get yours before it out of their stock.
Grab it with the Buy Now button Below


Buy from Jumia
N53,000
Infinix Zero 3 X552 16GB - Anthracite Grey 

Below is the rooting method waiting for your Infinix Zero 3 and Im pretty sure that you will like to root it probably because you will like to enjoy your phone to the fullest.


Materials Needed For Rooting
» PC with internet connection
» USB Cable
» SP Flash Tool - Download it Here
» SuperSU.zip - Download it Here 
» Download Ported TWRP by Team Hovatek For Infinix Zero 3 X552 - Download it Here

To Root Infinix Zero 3 X552 
» Save the SuperSU.zip that you downloaded to your phones SD card
» Unzip the TWRP for Infinix Zero 3 .zip file that you downloaded and flash the recovery image to the phone using SP Flash Tool
How Can I Flash it Using SP Flashtool? Check out this link for the instruction: www.shoutamloud/2015/09/how-to-flash...

» Now, boot your phone into TWRP Recovery Mode (by Holding the Vol Up and Power button simultaneously for 5 seconds)
» In TWRP Recovery, Choose install zip from SD card - to choose a zip from SD card use Vol up and down scroll up and down, then choose the Supersu.zip file from the root of your SD card.
Scroll to yes and install, after a successful flashing go back and reboot.

It is simple as that. You may download Root Checker from Play Store to verify your root privileges. After downloading, simply Install Root Checker, run it and you should get a success message after then.

Important Notice
After rooting your phone, it’s advisable to unroot before performing an OTA update or restoring factoring settings.
Also note that this is the available method for it now, we will update you as soon as we get another simple method. 

All Credit goes to Team Hovatek.


Get

Read more »

How to Update Manually Huawei P8 Lite ALE L21 to Android 6 0 Marshmallow B560 Europe


Huawei P8 Lite (ALE-L21) has got a fresh Marshmallow 6.0 update rolling out in several parts of Europe carrying C432B560 build number.

Don’t worry we are going to share step by step guide to safely Update Manually your Huawei P8 Lite (ALE-L21) to Android 6.0 Marshmallow B560 [ Europe].


÷ Firmware Details: 

  • Device: Huawei P8 Lite
  • Model: ALE-L21
  • Android: v6.0 Marshmallow
  • EMUI: 4.0
  • Firmware: B560
  • Build Number: ALE-L21C432B560
  • Release Date: 10.05.2016
  • Region: Europe
  • Country: Poland
  • Status: Official (stable)
  • Type: Full firmware image
  • File Name: Huawei_P8 Lite_Firmware_ALE-L21_Andriod 6.0_EMUI4.0_C432B560_Poland_Channel-Others.zip


View my Flipboard Magazine.


 ÷ Prerequisites:

•This tutorial is only for installing Android 6.0. Marshmallow C432B560 build number on Huawei P8 Lite (ALE-L21) . Please do not try on any other Huawei P8 variants.


*Disclaimer:

Android Custom ROM fix ® provide various Firmware Updates and Rooting process along with Custom ROM,Modes,file are all belong  to their owners/developers. The autor of this site or the developers are not responsible,  if you damage or brick your device.Do it on your own risk and follow the instruction properly.

* Important:

Backup important files stored on your device before proceeding with the steps below, so that in case something goes wrong you’ll have backup of all your important files.


÷ How to Update Manually Huawei P8 Lite (ALE-L21) to Android 6.0 Marshmallow B560 [ Europe]

1- Download C432B560 Firmware & Extract the Zip package.

2-Copy the dload folder (present in the extracted Software directory) to the external microSD card.
Open the dialer and enter *#*#2846579#*#*


3- In the Project Menu, go to Software Upgrade > SDCard Upgrade and press Ok.

4- Your phone will automatically reboot into the recovery and flash the update.


That’s it! Your Huawei P8 Lite (ALE-L21) should now have Marshmallow 6.0 C432B560 build number installed on your phone! Go to Settings > About phone to verify


For more Huawei P8 Lite latest updates keep checking AndtoidCustomRomFix™®

Like this post? PLZ Hit the share buttons below to share this article with your friends on Facebook, Google + and Twitter.

PLZ Follow Us On Flipboard 4 More Latest Updates.

PLZ Use the comment box below to contribute more ideas & Suggestions .

Best Regards.


Get

Read more »

How to Update OnePlus 3 to Android 6 0 1 Unofficial CyanogenMod 13 CM13


According to XDA member Grarak , unofficial build of CM 13 is now available for OnePlus 3 (all variants).


This ROM is not developed by team CM but based on their CM 13 source code and latest Android 6.0.1 Marshmallow.It is a very clean ROM and features rich Custom ROM.You will also get the DOZE Mode resulting in good battery life.


÷ Known issues:
Camera: HDR works, but you it closes after you took a picture.
F2FS: Not supported yet.
Battery life: Is not really as good as stock.
MSM8996: It‘s a new platform. Don‘t expect that CM 13 will run as good as stock.

* Don‘t flash gapps after you booted up CM 13! This will kill your device. If you want gapps, then flash it right after you wiped your phone and flashed CM 13.


÷ Prerequisites:

•This tutorial is only for installing Unofficial build of CM 13 is now available on OnePlus 3. Please do not try on any other one plus variants.

•Your phone should be rooted and haveClockworkMod recovery installed from before.

•This tutorial will wipe out all your data.Proceed at your own risk.Perform a Dalvik Cache wipe before proceeding from the recovery mode.

•Make sure you backup all your data in your phone before proceeding.

View my Flipboard Magazine.

 *Disclaimer:

Android Custom ROM fix ® provide various Firmware Updates and Rooting process along with Custom ROM,Modes,file are all belong  to their owners/developers. The autor of this site or the developers are not responsible,  if you damage or brick your device.Do it on your own risk and follow the instruction properly.

* Important:

Backup important files stored on your device before proceeding with the steps below, so that in case something goes wrong you’ll have backup of all your important files.

ROM Download & Installation Instructions via XDA


For More  OnePlus 3 updates Keep Checking Android Custom ROM Fix™®

Like this post? PLZ Hit the share buttons below to share this article with your friends on Facebook, Google + and Twitter.

PLZ Follow Us On Flipboard 4 More Latest Updates.

PLZ Use the comment box below to contribute more ideas & Suggestions .

Best Regards.


Get

Read more »

Update Galaxy S6 G920F to Android 6 0 1 Marshmallow XtreStoLite Custom ROM Fast Smooth


Samsung Galaxy S6 G920F XtreStoLite custom ROM comes with tons of new features and is based on Android 6.0.1 Marshmallow. A quick list of the main features in XtreStoLite is given below and we are sure you’d love to use this on your Samsung Galaxy S6 G920F:


Android 6.0.1 Marshmallow.
Official Samsung’s firmware based.
Deodexed.
Fast & Smooth.
Stable...

Don’t worry we are going to share step by step guide to safely Install easily Android 6.0.1 Marshmallow XtreStoLite Custom ROM [ Fast & Smooth] on your Galaxy S6 G920F.

View my Flipboard Magazine.


 ÷ Prerequisites:

•This tutorial is only for installing Android 6.0.1 XtreStoLite ROM on Samsung Galaxy S6 G920F. Please do not try on any other Galaxy S6 variants.

•Your phone should have a custom recovery installed in order to install this XtreStoLite ROM on your phone.

•We will be using TWRP Recovery for this tutorial.

•This tutorial will wipe out all your data. Make sure you backup all your data in your phone before proceeding.

•Samsung KIES will NOT detect your phone after installing this ROM because it is a custom firmware.

•Perform a Dalvik Cache wipe before proceeding from the Recovery Mode.


*Disclaimer:

Android Custom ROM fix ® provide various Firmware Updates and Rooting process along with Custom ROM,Modes,file are all belong  to their owners/developers. The autor of this site or the developers are not responsible,  if you damage or brick your device.Do it on your own risk and follow the instruction properly.

* Important:

Backup important files stored on your device before proceeding with the steps below, so that in case something goes wrong you’ll have backup of all your important files.


÷ Update Galaxy S6 G920F to Android 6.0.1 Marshmallow XtreStoLite Custom ROM [ Fast & Smooth]

Step 1 – Download Android 6.0.1 XtreStoLite ROM for Galaxy S6 to your computer.

Step 2 – Connect and mount your Galaxy S6 USB memory to your computer using the USB cable.

Step 3 – Now copy/paste the downloaded Android 6.0.1 ROM zip file to your phone memory / SD card. Make sure the file is in the phone memory / SD card root (not in any folder).

Step 4 – Then turn OFF your phone and disconnect from the USB cable.

Step 5 – Now to get in the Recovery Mode. Switch ON the phone while pressing and holding Volume Up + Home + Power buttons together.


Step 6 – Once you are in TWRP Recovery, perform a full data wipe by tapping on the ‘Wipe’ button. Then swipe on the “Swipe to Factory Reset” option at the bottom.


Step 7 – Now go back to the main menu and then tap on the ‘Install’ button. From the list, choose the ZIP file that you copied to your phone memory in Step 3.


Step 8 – Confirm installation on the next screen by swiping on the “Swipe to Confirm Flash” option. The installation procedure should start now

Step 9 – Once the installation is completed.

Step 10 – Tap on the “Wipe cache/dalvik” button if you get into any boot loops or other issues.
Step 11 – You can now reboot your phone by selecting the “Reboot System” button.


Your Samsung Galaxy S6 will boot now and it might take about 5 minutes to boot on your first time after flashing a new ROM. So, please wait.

That’s it! Your Samsung Galaxy S6 should now have Android 6.0.1 XtreStoLite Marshmallow custom ROM installed on your phone! Go to Settings > About phone to verify.

For More Samsung Galaxy S6 Keep Updates Checking Android Custom ROM Fix ™®

That’s all. We hope this guide serves you well. If there’s anything you’d like to be added/changed on this page, PLZ Use the comment box below to contribute more ideas & Suggestions .

Like this post? PLZ Hit the share buttons below to share this article with your friends on Facebook, Google + and Twitter.

PLZ Follow Us On Flipboard 4 More Latest Updates.

Best Regards.™


Get

Read more »

WhatsApp is now free and promising to stay ad free

WhatsApp is letting go of its subscription fees which users previously pay so as to gain access to the famous messaging service. WhatsApp adopted a fee system some few years back; giving new users no other option but to pay an annual 99 cents subscription after the first year. “As we’ve grown, we’ve found that this approach hasn’t worked well,” WhatsApp officially admitted in a company blog post today.
WhatsApp is now free promising to stay ad free
“Many WhatsApp users don’t have a debit or credit card number and they worried they’d lose access to their friends and family after their first year. So over the next several weeks, we’ll remove fees from the different versions of our app and WhatsApp will no longer charge you for our service.” NO REFUNDS IF YOU’VE ALREADY PAID THE FEE In the case where you have been making use of WhatsApp for the six years it has open to use, then it is possible you couldn’t have seen these subscription fees.
A lot of original users were gifted a free lifetime service, but lately just some few years past, the company initiated the introduction of subscription to new users. Should you have already paid the 99 cents for the year then there wouldn’t the occurrence of a refund, but then subscription fees will stops at once.
On record, WhatsApp now has boasts a user base close to 1 billion users, so the free timing keeps off the barrier for millions more to jump on the messaging service. From the look of things, the Facebook-owned service is nursing plans to generate revenue via services to businesses. “We will test tools that allow you to use WhatsApp to communicate with businesses and organizations that you want to hear from.” The implication of this is that you could have the capacity to send WhatsApp messages to your airlines sometime to come. WhatsApp is not really making plans to grant third-party ads the enablement to the service, and it is maintaining its stand to its founding principles. The founders of WhatsApp were notably in opposition to ads, famously acclaiming back in 2012 that “when advertising is involved you the user are the product.”


Get

Read more »